AFC GRILLED : Chef Sean Connolly

An evening of good food.

Lap Cheong Watermelon Bites

An asian take on watermelon bites!

Baked Fish with Kiwi in Sweet and Sour Sauce

Add a twist to sweet and sour fish!

Semperit Pandan Cookies

Cute cookies for the festive season!

Friday, January 29, 2016

Event: Little Thumbs Up - Feb 2016 / Chrysanthemum, Edible Flowers

13 comments

If somebody offers you a great opportunity but you aren't sure you can do it, just say yes
– then learn how to do it later! ~ Richard Branson

"Challenge accepted ! " These words crossed my mind when Zoe (Bake for Happy Kids) approached us to host the Little Thumbs Up event for February 2016. The theme is an interesting one - chrysanthemums and edible flowers.

Dried chrysanthemums are fairly easy to find in supermarkets. That makes it a great ingredient to explore. It is said to have many health benefits from helping with the flu, acne, reducing stress levels and improving vision.

Dried Chrysanthemums Steeped In Hot Water

I was also really keen to work with Blue Pea Flowers aka Butterfly Pea Flowers, but fresh ones were almost impossible to find in the markets I frequent.

Blue Pea Flower
So, I did the next logical thing. I planted one in the balcony. I wasn't sure how it would work out then but it did. The plant flourished and I had so many flowers that I sun-dried them for future use.

On top of that, I planted three more.

From this initiative, I learned not only about the various culinary uses of this edible flower, I picked up gardening as well and discovered how easy it was to grow this from seed.

That said, a huge THANK YOU to Zoe for entrusting us with this event!

~~~~~~~~~~~~~~~~~~~~~~

Here's how you can join us in this fun cooking/baking exercise which will run from 1st Feb 2016 until 29th Feb 2016:

1) Cook, bake or make any recipe using chrysanthemums. It can be the flowers or the greens. The ingredient may be in dried form, a juice or fresh. Alternatively, make any recipe with edible flowers - any edible flower! We're throwing the net wide open here.

Either create your own recipe or use what you can find from cookbooks, websites or from your relatives but please ensure that you credit your sources. It's the decent thing to do.

2) Your cooking adventure must be posted within the period of the event. Add the relevant blog link to the linky tool provided below. You may add as many as you wish as long as it fits the theme.

3) Add this note (including the links) at the end of your post.

This post is linked to Little Thumbs Up - Feb 2016 which is organised by Zoe from Bake for Happy Kids and Doreen from My Little Favourite DIY, and hosted by Sweet Home-Chefs .

4) Include the 'Little Thumbs Up' badge. Grab it here or save this image out :


5) Make new friends. Visit other blogs and leave an encouraging comment. This is not compulsory, of course but it is a rewarding experience. I've made friends with many lovely bloggers and gained so much knowledge about cooking from this activity.

Note: This linky tool will be open from 1st Feb 2016 until month end.

Read more...

Tuesday, January 26, 2016

Fried Popiah With Honey-Milk Powder

16 comments

I was having a conversation with my aunt about food we used to eat when we were young. This addictive snack popped up - fried popiah with milk powder. It was something that we all loved to munch on during family gatherings. My aunt used to make this for Chinese New Year. She is part to blame for our expanding waistlines during the festive season!

I am only too thrilled to carry the tradition on.

Fried Popiah With Honey-Milk Powder

This yummy snack is easy to make! It's nice and crunchy. Imagine plain potato chips with lightly sweetened powdered milk - that's how this tastes like to me.

This are several variations to this recipe. Some flavour it with icing sugar. Others with a mixture of powdered milk and icing sugar. Then, there's the traditional recipe where ground green bean and sugar is used. For the traditional recipe however, the crackers or whatchamacallit is made from scratch with flour and coconut. We know this snack as 'Batang Buruk' (rotten log/wood) . Popiah skin is a convenient replacement of modern times.

Here is the recipe.

Fried Popiah With Honey-Milk Powder
Ingredients:
- 40 popiah skin, 8.½" x 8.½" (spring roll pastry - I used KG Pastry)
- 3 to 4 cups Dutch Lady honey-milk powder (or any other brand)
- 1 egg
- Cooking oil (enough for deep frying)
- Paper napkins

How-to:

1) Lightly beat the egg in a small bowl. Leave aside.
2) Lay out one popiah sheet. Brush the edge of one corner with egg. Using a chopstick, roll the popiah skin from the other end into a cylinder shape meeting the corner with the egg wash. Press lightly to seal. Do the same for the rest.
3) Slice the rolled popiah skins into bite sizes.
4) Heat cooking oil in a deep pan. Deep-fry the bite-sized popiah until it reaches a nice brown.
5) Place into a stainless steel wire mesh bowl lined with paper napkins to drain excess oil. Then, spread it out on a tray lined with fresh paper napkins to cool. (I changed the napkins once in between.)
6) Once it cools completely, toss lightly in honey-milk powder. Store in an air-tight container.

1) Popiah Skin/Wrapper 2) Egg and Chopsticks For The Popiah Roll
3) Rolling The Popiah 4) Forty Rolled Pieces
5) Slice The Popiah Rolls 6) A Sliced Popiah

Popiah Bites Ready For Deep-Frying

8) Popiah Bites Being Deep-Fried 9) Drain Excess Oil
10) Cooling The Popiah Bites 11) Once Cooled, Toss In Milk Powder

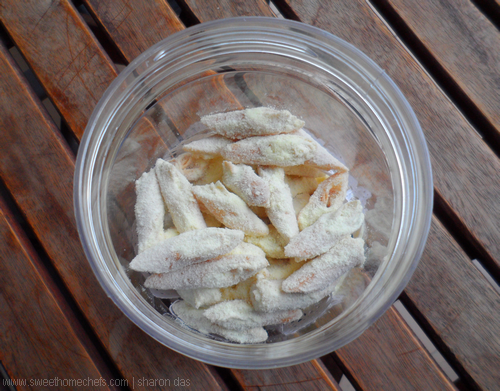
Fried Popiah With Honey-Milk Powder

I managed to fit these into three plastic cookie containers that were about 4½" (height) x 3½" (diameter) in size.

Fried Popiah With Honey-Milk Powder Stored In Airtight Containers

These Are For Eating!

Yummy Fried Popiah With Honey-Milk Powder

~~~~~~~~~~~~~~~~~~~~~~~~~~~~~~~~~~~~~~~

Read more...

Wednesday, January 20, 2016

Peanut Butter Cookies

8 comments

In the words of Mr. Spock, "Live long and prosper." The phrase made its way into my mind today whilst thinking about Chinese New Year. I wondered if the family will find it amusing if I greeted them with a long-live-and-prosper instead of the traditional 'Kong Hee Fatt Choy'. Hard to tell, but I intend to try it this year.

Peanuts are said to be a symbol of long life. That is why I have always included it in festive goodie bags, which I give away to closest friends and family. Besides the packet of peanuts, this year's bag contains longevity noodles, nian gao, red dates and mandarin oranges.

Since we are now weeks away from Chinese New Year and I coincidentally had a jar of peanut butter which will be expiring soon, it just seemed apt to bake it off into festive auspicious cookies to be given away. Hubs loves peanuts. He was thrilled to find out I was making these. I wasn't. You see, I'm not a big fan of peanut butter, but surprisingly I was addicted to eating these.

Peanut Butter Cookies

These cookies are peanut buttery and dense. Personally, I find cookies like these best enjoyed in small portions. Hence, I made them bite-sized.

Peanut Butter Cookies

(Qty: About 80pcs)
Adapted from The Golden Book of Cookies
Ingredients:

- 1 ⅔ cups all-purpose flour
- 1 tsp baking powder
- ½ tsp ground nutmeg
- ¼ tsp salt
- ½ cup dessicated coconut and some extra for decorating
- 90ml Naturel Sunflower & Canola Blend cooking oil
- 90ml honey
- 1 cup chunky peanut butter
- Candied cherry bits for decorating

How-to:
1) Pre-heat oven to 165C. Line tray with baking paper.
2) Using a mixer - beat cooking oil, honey and peanut butter until combined.
3) Sift flour, baking powder and ground nutmeg over the mixture. Add salt. Mix with a baking spoon.
4) Add dessicated coconut. Mix to combine.
5) Press some of the dough into a rounded 1tsp baking spoon. Slide it out. Gently dip the bottom of the cookie dough onto some dessicated coconut. Roll some onto the sides too. Top with a candied cherry bit.
6) Bake at 165C for about 8 minutes on a lined baking tray. (Please do a bake test. Bake one cookie to see if this temp and time works for you.)


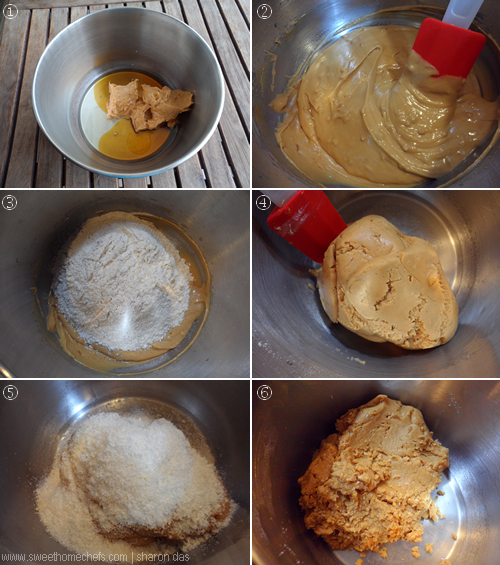
1) Mix wet ingredients together. 2) Combined wet ingredients.
3) Sift the dry ingredients over. 4) Combine wet and dry ingredients.
5) Add dessicated coconut. 6) The dough is ready to be shaped.

7) Use a spoon to shape the dough. 8) Dip the bottom of the dough onto the coconut.
9) Top with candied cherry. 10) Bake!

Peanut Butter Cookies Fresh out Of the Oven!

Admiring My Peanut Butter Cookie

The Bottom Is Nicely Browned

The cookies pictured above were the festive version. These, on the other hand, were made without the candied cherry. I have flattened the cookies a little. But I still dipped the bottom of the dough with coconut to keep it from browning too much.

Flattened The Dough For A Non-CNY Version

Peanut Butter Cookies Without The Cherry Bits

I packed them into plastic containers the next day. Off it went to business acquaintances!

~~~~~~~~~~~~~~~~~~~~~~~~~~~~~~~~~~~~~~~


Read more...

Monday, January 11, 2016

Foil-Baked Chicken With Red Anjou Pear

13 comments

EXCITING NEWS

Evelyn and I are excited to announce that we will be moving our blog to

www.sweethomechefs.com
sometime this week.


Surely this calls for a celebration. That I did with a baked chicken dinner that my loving husband described as 'bursting with flavour!'. I was tickled by his enthusiasm and was so pleased with the remark that I stored the moment in my mind under the Happy Memories folder.

Foil-Baked Red Anjou Pear Chicken

It started with a trip to a fruit store in Sri Petaling. There, I picked up some Red Anjou pears that quickly became my new love and for good reason. They were ruby red. That's a good enough reason for me, at least!

The pears are juicy and has a less gritty texture than the ones I'm used to; it has a well-rounded sweetness that I cannot accurately describe. All I can say is that it's pleasant to eat - this, in the 'very' sense.

I decided to go with a foil-baked recipe to trap the juices in. You would too, if you like a bit of gravy for the white rice you're pairing it with. It turned out to be a flavourful dish, further enhanced with the addition red dates and ginger honey. The chicken was moist and tender.

Here's how I made this.

Foil-Baked Chicken With Red Anjou Pear

Ingredients:
- 1 whole chicken
- 1 tbsp Culpeper ginger honey
- 1 tbsp oyster sauce
- 1 red anjou pear (cut into chunks)
- 3 dried Shiitake mushrooms (rehydrated - do this earlier, remove stem and cut into halves)
- 10 dried red dates (make a small cut)
- 1 thumb ginger (smashed)
- Black pepper

How-to:
1) In a deep bowl, rub chicken with ginger honey and oyster sauce. Keep aside. Prepare the rest of the ingredients (cutting pear, etc.).
2)  Pre-heat oven at 175C.
3) Line a deep baking tray with foil.
4) Place chicken on foiled tray. Fill the cavity with smashed ginger, a couple of red dates and pear pieces.
5) Place the remainder of the ingredients (mushroom, pear and dates) around the chicken.
6) Use the marinade left in the bowl to make the gravy. Pour ½cup (more or less) water into the same bowl to dilute the marinade.Pour this around the chicken on the foiled tray.
7) Season with several dashes of black pepper over the chicken.
8) Finally, cover the chicken loosely over the top with foil, and seal the sides. Let it steam-bake until cooked.

This took me about 1½ hours at 175C, and it was left to rest for a further 30 minutes before I finally took the foil off. Baking times will vary depending on the size of the chicken.

Best eaten with rice or as is.

1) Sprinkled with black pepper, it's ready for the oven.
2) Rub the chicken with ginger honey sauce and oyster sauce.
3) Leave aside. Prepare the rest of the ingredients.
4) Place the chicken on a foil-lined baking tray.
5) Cover with foil and bake.

Fresh out of the oven - Baked Chicken With Anjou Pear!

Nom nom with rice!

Baked Chicken with Red Anjou Pear and Shiitake Mushrooms

Read more...

Wednesday, January 6, 2016

Tofu With Minced Pork And Preserved Vegetables

18 comments
"I've got a tummy ache.." - As soon as these words are uttered, rice porridge (congee) would be the meal of the day. That's how it works in my family. It's good for the stomach, Grandma would insist against the scrunched-up face of her grandchild, that is me.

I hated ..aah, but hate is a strong word. I disliked eating rice porridge as a child. There would be bits of carrot and a small spoonful of Bovril stirred in.  Now that I'm an old makcik (auntie) in her 40s, I appreciate it a whole lot more. It does make me feel better on days my stomach acts up.

However, I'm not one for plain food. Hence, this pork tofu dish to complement my rice porridge. The shredded Sichuan preserved mustard stems provided plenty of flavour, enough for me to say, "Yum!".

Tofu With Minced Pork And Preserved Vegetables

Tofu With Minced Pork And Preserved Vegetables
Ingredients:
- ½ cup minced pork
- ½ cup shredded Sichuan preserved vegetable (rinse)
(optional: soak in water to further reduce saltiness if that is your preference)
- 1 medium-large red onion (chopped)
- 3 cloves garlic (chopped)
- 1 red chili pepper (chopped)
- 1 packet smooth/soft tofu (300g)
- Black pepper
- A handful of fresh coriander
- 3 tbsp cooking oil

How-to:
1) Heat cooking oil in pan.
2) Saute onion and garlic for a minute or so.
3) Add in the preserved vegetables. Stir-fry.
4) Then, add the pork mince and season with a dash (or more) of black pepper. Stir-fry until the pork is cooked.
5) Then, add the red chili. Stir-fry. Finally, in goes the smooth tofu. Stir-fry lightly, smashing the tofu as you go along. Taste, add salt only if necessary.*
6) Serve garnished with fresh coriander.

*I added no salt as the preserved vegetables provided just enough saltiness.


1) The ingredients - Tofu, Pork, Preserved Vegs
2) Soft Tofu 3) Saute the onion/garlic. Add Preserved vegs.
4) Adding the pork mince. 5) Stir-fry until cooked.
6) Finally, add the tofu.


Tofu With Minced Pork And Preserved Vegetables - Let's Eat!

Best eaten with plain rice porridge. Good with plain rice as well.

Tofu With Minced Pork - Best Eaten With Rice Porridge

Happy New Year from all of us (that's just Evelyn and me) at SHC!

Read more...
 

Sweet Home-Chefs Copyright © 2013-2017 Template Designed by BTDesigner · Powered by Blogger